Desert Photography Primer
How-to Photographic Series
by Chris Wray
Part 1: Basic Knowledge & Exposure
The intent of this how-to photographic series is to help strengthen your abilities with a camera. At the same time, I hope to inspire you to look deeper into the desert landscape to find the places and images that offer challenges beyond the ordinary.
This first article in the series is a nuts-and-bolts piece to quickly dispense with some of the needed definitions and technical know-how. The topics in this series cover:
- Basic Knowledge & Exposure
- Landscape Photography
- Types of Lighting Encountered in the Desert
- Details and Close-ups
- Black-and-White
I do not have the space to make these articles a complete course in photography. If you need basic training in camera use, the best action is to buy one of the many books available. I want to spend time discussing how photography is affected specifically by the desert. This information is much more difficult to find than basic photo knowledge.
Cameras
I need to say from the outset that you do not need a fancy, expensive  camera in order to make good photographs. As people progress in photography, they find that buying a camera which allows them to change lenses is a great help. The common SLR (single lens reflex) offers much more control and versatility than a point-and-shoot. Even an older SLR with a normal lens offers you image quality you will find hard to surpass.
I have a digital 35mm camera and lenses I use quite often. However, I sometimes carry a clunky 1960s camera for rough trips and wet weather hiking. The light meter died years ago, so I have to make educated guesses about exposures for each picture. There are photographs made with both of these cameras included in this series of articles. To help make the point about not needing expensive equipment, I am not going to tell you which photos came from which camera.

Equipment
My experience with desert photography is to keep the equipment list as simple as possible. I generally take one camera body, maybe two lenses, film and one or two filters. For lenses, I like to have a wide-angle and a telephoto. I rarely carry anything else. For 35mm work while hiking I will not usually take a tripod. I know this makes many photographers shudder, but hang in there and let's see what is possible without one. I will show examples of lens and filter characteristics as this series continues.
The camera equipment should be packed into a bag sealed against sand and water. I like daypacks rather than expensive camera bags because they tend to be more comfortable. Daypacks also don't look like camera bags, especially to those people who might like to steal your camera. I carry a plastic bag large enough to cover the camera and lenses in case it rains or is very windy and sandy.
If You Still Use Film
A short discussion on film is appropriate. I know the majority of desert travelers use negative film so they can have color prints. This is okay, but if you really want to see the changes and possibilities of your photography, you owe it to yourself to use some slide film occasionally. Slides usually have better color, contrast and sharpness than prints. The main difference is that prints have another step in the process; that is, making the actual print.
Printing is a huge part of the outcome. What you see when you get your prints back is someone else's interpretation of your negative (usually a machine's idea of what you wanted). The negative can be printed an infinite number of ways regarding its darkness, color balance and contrast. With slide film you create the end result when you push the shutter release. The processing is tightly controlled, and you get the original. All of the color images for this series were made on slides. It is because of this that I can show samples of the techniques covered.
IOS Speed
To succeed in any area of photography you need to have a working understanding of how exposure works. The first concern is the film speed. This is the manufacturer's suggestion at how sensitive the digital chip is to light. I say suggestion, because I rarely have a camera set on the rated film speed. You need to realize that film speed is not set in stone. Feel free to play with the speed settings a little to adjust the outcome. If you find a picture is too dark at the initial setting, set the ISO to the next lower number on a few frames next time and see what happens.
If you use slide film in a non digital camera it will show immediate changes with a slight ISO shift, while print film will tend to be corrected back when the prints are made. Seasoned photographers know that altering the ISO setting to calibrate a certain camera to the film is not uncommon. If your camera only has automatic film speed setting, then you are out of luck. You can check the owner's manual to see if you have manual settings you can alter, or other features designed to allow more or less exposure.
Metering
The next concern is the camera's metering. While modern cameras may have several metering options, they all are designed to do the same thing. The end result of the meter is vital to understand, especially for desert photography. There is a rather boring looking object called a gray card. Even if you never see a real one, just imagine a big gray battleship and you will know the shade. This is a scientifically derived idea of what a common scene should be exposed to resemble.
In other words, the meter wants to make whatever it sees look this tone, not this color, just this brightness. When the subject is a Christmas tree, this is fine. When the subject is a desert landscape, this may be a big problem. The meter will average whatever it sees, including strong lights and darks, and assign an exposure for middle gray. For this reason, a scene does not need to have an actual middle gray object in order to meter correctly. The idea is to consider whether or not what your meter sees is going to average into an appropriate middle gray.

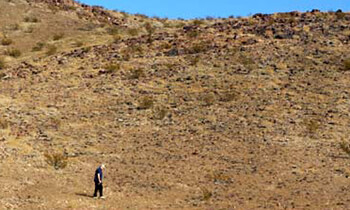
A colorful landscape, or one with a mix of sun and shade, will usually average okay. The accompanying view of the badlands in Grave Wash exposed well, because the coloring and shadows on the slope averaged enough to make sense to the meter. The common problem in the desert during the day is that most scenes are brighter than middle gray. Probably every photographer of desert landscapes has seen the resulting dark images when the meter decided to turn a white salt flat into a gray vastness (snow scenes are the same situation). What to do?
This is one place where adjusting the ISO comes in very handy. If you set the film speed slightly lower than its rating, you will increase the exposure. You have to get to know what usually works with your film and camera by experience. Different films have different reactions to the same change in exposure.
 If you use print film, it can also be brought back in at this point -- to mention another of its important traits. Not only does the camera try to average the scene into middle gray, so will the printing machine. The printing process assumes the image was made for a standard middle gray meter reading and reacts accordingly. If you only take negative film with automatic metering all the time, this if fine. If you want to change the exposure for some reason, say to brighten up that salt flat, the printing machine will try to adjust it back for you. It is important to keep this in mind when using negative films.
Exposures
Many newer cameras have exposure compensation controls. Your camera may have an "autoexposure lock" feature. This allows you to meter off a good middle gray subject and hold that reading as you move the view to include the bright or dark area. The image of the agave stalk was made this way. The shadowed hillside was far too dark and would have triggered a much brighter exposure. I metered off an area outside the scene, and held that setting while I reframed the view. The shadows remained dark like they should, and the agave has an appropriate daylight exposure.
The image of the ocotillos at sunset in San Felipe Wash is also an example of a desert landscape which worked using a straight meter reading. The small plants and the shadows made for a good middle gray. This is also the type of image where isolating an area to exclude nearby bright or dark areas greatly enhances the likelihood of success.

 The detail of the plants in the pond at Palm Spring was also made allowing the meter to do its thing. This image could have quickly been ruined if more of the dark water had been seen by the meter.
The view of the Yaqui Well mesquite branches needed more exposure than indicated, because the sky is somewhat light and is not a good middle gray. The meter would darken the view accordingly.
The most difficult challenge for any outdoor photographer is when you try to combine areas lit by the sun with areas of shade. The desert helps to some extent, because the shadows are often rather bright compared to their mountain or urban counterparts. Light-colored rocks and plants make for a more open feel to the shadows. If deep shadows are an important part of a scene, however, you may have trouble. There is no easy answer for the mixed lighting problem. You have to decide which part of the scene is more important and expose for that area. Small areas of too-bright or too-dark will not be as distracting as large areas. Composing the scene to exclude large areas of different lighting is the best choice if you feel you may lose detail in one area.
If you study photographs in books and magazines, even those made by famous photographers, you will notice there are very few with strong mixed lighting. Photographers are savvy about creating images that are interesting without relying on strong sun and shadow contrasts to make them striking. In fact, most published color work is made almost entirely in either full sun or full shade, with only small areas of the other.

The image of the jug on the truck at Key's Ranch in Joshua Tree is a good example of combining both sun and shadow. The exposure was made to favor the sunlit areas and allow the shadows under the truck to fall into darkness. Luckily, the jug and the shaded wood were still bright enough to show detail.

I hate to give too many rules and examples of how various objects fall into the realm of exposure, because the desert offers one of the greatest extremes in photography. One can see brightly lit ridges with glancing sun in one direction, then turn to gaze into a deep canyon where only soft, reflected light reaches the ground. These constant changes in the scenes you encounter will dictate what is important to the specific photograph.With slide film, you also have the ability to make an initial exposure, then adjust the camera settings for a slightly lighter or darker image and make another version. This technique is called bracketing. Usually, only a slight change is needed to make a good difference in the final image. You then simply show people whichever slide looks better. They don't need to know the other one exists, and you look like you knew exactly what you were doing the whole time.
Enough with technicalities for now. To close this first article, I wanted an image to lead into the next topic in the series on landscape photography, but not just another badlands view. This impressionistic hillside image was made in western Anza-Borrego by photographing the reflection of the canyon wall in San Felipe Creek. Some of these uncommon ways of experiencing the desert are what I hope to inspire others to notice in the coming articles.

Desert Photography Primer
(1 of 5) - Basic Knowledge & Exposure ( this page)
(2 of 5) - Desert Landscapes
(3 of 5) - Types of Desert Light
(4 of 5) - Details & Close-ups
(5 of 5) - Black & White Photography


Share this page on Facebook:
The Desert Environment
The North American Deserts
Desert Geological Terms


